


It is no secret that I have a love for white kitchens. Maybe it’s the cheery and bright feeling I get when I step into a kitchen that is all white, or the meeting of modern and vintage. Or maybe it’s the fact that when I was growing up, my mom always had a white kitchen, so it’s what I was familiar with. Whatever the case, when we were house-hunting, my husband told me “babe, if you want a white kitchen, we’ll find you a white kitchen.” How sweet, right? 🙂

We looked high and low, near and far. We really looked everywhere for a house that fit our criteria plus a white kitchen. Unfortunately, there was none to be found in our price range. What we did find was a suburban home that fit all of our needs. Except it had an oak kitchen. I guess the color of the cupboards wasn’t exactly a need.
So, we decided to make our kitchen white. We decided to paint our kitchen.
Yes, many people probably thought we were crazy to paint over hardwood cabinets. We sanded, primed, and painted. Then painted some more. It was a huge project, and there were times when it felt like it would never get done. But finally, I got the white kitchen that I had always dreamed of!


To tell you the truth, we didn’t make all of these changes overnight. In fact, it took a little over 4 years to go from the BEFORE to the complete AFTER (below is pictured my husband, on the right, with our realtor the day we decided to purchase our home).

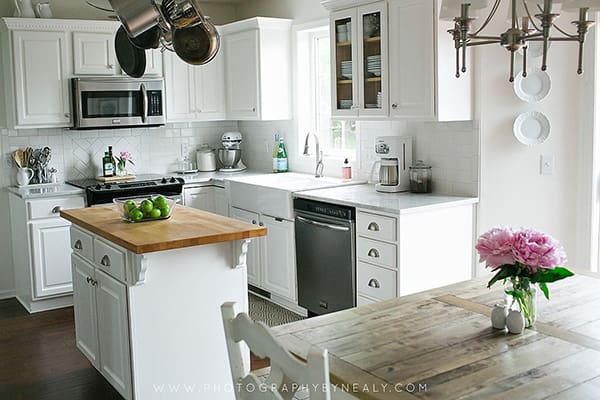
This was a HUGE project, and we really did almost all of it ourselves (except the floors and marable counters). To recap, here are our three kitchen redo phases:
PHASE ONE ($ – we did all of the work ourselves for this phase and were on a major budget!)
- sanded, primed, and painted all cupboards and trim (we had help from my parents – it took a full weekend/3 days from start to finish)
- replaced kitchen island with butcher board counter (from Ikea!)
- had some of the cupboards routed out in the center so we could add glass (glued with silicone and had glass cut from the hardware store)
- replaced the kitchen sink with a farmhouse-style sink (also from Ikea) and a faucet (Home Depot)
PHASE TWO ($$$ – the most expensive phase, due to the marble countertops and all new appliances. It took a few years for us to save our pennies for these things!)
- had Carrera marble countertops installed to replace the oak-lined laminate counters
- replaced all of the appliances with stainless steel (found at Appliance Smart)
- replaced cabinet hardware with a combination of satin nickel and glass knobs (glass knobs found at Hobby Lobby)
- added a white subway tile backsplash, including herringbone pattern above the stove (we did this ourselves with standard white subway tile found at Home Depot)
- added a pan-and-pan rack above kitchen island (also from Ikea – for the life of me, I cannot find the link anymore) and replaced light fixtures
PHASE THREE ($$ – the most recent phase)
- had all of the oak flooring replaced with a medium-dark, hand-scraped birch wood floors
- added crown molding to the top of the cupboards (we did this ourselves with help from my handy father-in-law)


This project was a LOT of work, and I am very happy to say that we finally have completed it! It took a combination of hard work, even more patience, and some sacrifices as we saved for the bigger items like new floors, counters, and appliances. It is fun to share the final product with you all now that is is completely finished! I hope to inspire you if you are considering painting your kitchen. However, I don’t want to discourage anyone with a wood kitchen – there is nothing wrong with oak floors or oak cupboards, or any kind of wood for that matter. 🙂 There are many beautiful homes with oak, and although we decided to paint ours, I don’t think that every kitchen should be white to be beautiful.
I hope you enjoyed this post! If you have any questions, feel free to leave a comment – if there are a handful, I may do a part 2 post on answering any questions. Thank you for taking the time to read this!
xoxo,
Nealy
10 comments
Really amazing before and after. Love the white and all the fun details in your kitchen!
You know I am a lover of white kitchens too! They look even better when they are all cleaned up!
I like the recent add with the crown molding, really makes a difference! Beautiful, Nealy!
Beautiful kitchen down to every last detail! I’m dying to know where you got your dining room table?? It’s gorgeous!
Oh my goodness! The transformation is unbelievable! We are building a house right now and chose white kitchen cabinets. I am SO excited to have a white kitchen!!
I am IN. LOVE. with your kitchen table and chairs. Please tell me where I can find one like it!
Awesome post. Stunning photography. Inspiring all around!
Blessings,
Angela
Des Moines Moms Blog
How did you get rid of the grain look when you painted your oak cabinets?
Nice job! We are in the middle of a kitchen remodel too! Also going with for the white look!
Exquisite. I, too, love a white kitchen. But my daughter loves chocolate.
Maybe someday!
This is gorgeous!!! Would love to hear more about your process for painting the cabinets and how you got them to look so perfect!!! And also how you retrofitted your cabinet for the ikea farmhouse sink since that sink is heavy!! 🙂 beautiful job! I can’t wait to make our kitchen white!! 🙂
I love this. My floors and cabinets are the same color as your “before” picture. I have a couple of questions… Did you paint or replace trim throughout the rest of the home? What about your windows and patio door? Were they white or did you paint them as well? Do you have pictures of what your counters looked like with the replaced sink but old counter? I would love to do that this month. Great change! Is there anything you learned or would do different next time? Great timeline information. Thanks for sharing!
Hi Nora! Thanks for your comment! Great questions. We painted all of the trim, the fireplace, everything. We didn’t replace it, just painted the oak throughout the house. I don’t have a before picture of the sink, but it was very standard…the new Ikea sink was the same width as the cupboard area that the sink was on. Let me know if you have any more questions! It is a lot of work, but it’s SO worth it! 🙂